| HOME | | | ABOUT BRENT | | | GALLERIES | | | Fish | | | EVENTS | | | BLOG | | | MAILING LIST | | | CONTACT |
 While there have been advancements in technology, many use the methods that were used in the Bronze Age in order to cast their bronze. Here are some steps to take to do this:
The first step is to create the pattern, which is the oil or water based clay positive of your statue. This is a very creative part of the process as you’re setting the look for the future piece. Once you’re satisfied with how your clay creation looks, you’re ready to mold.
To create the rubber mold first apply a silicone based spray to your clay so it doesn’t stick to the mold. One coat at a time, a urethane or silicone rubber mold is applied to the pattern. The first two layers should be thin in order to capture details and to make sure there are no air bubbles.
Plastic will buttons are inserted along the seam to make sure the mold can fit back together after it has been removed. Once the rubber encases the pattern, the shell (made of molding plaster and hemp fiber) is created in order to keep the rubber mold in its correct shape.
A petroleum-based wax is then melted and poured into the rubber mold. Make sure it is moved around the entire surface so that no details are missed. Repeat this until you reach a thickness of 1/8” to 1/4”. Once the wax cools, remove it from the mold and clean up any seam lines that were left behind. Then, wax rods are used in order to provide channels for the metal to flow through and get to the pattern. It also allows gas to escape as the pattern fills up.
The wax is covered in a ceramic slip that is made of colloidal silica and silica flour. This mixture sticks to the wax and any extra would drain back into the mixing tank. Silica sand is poured over the surface. Fine stucco is used first to capture details, and then courser stucco to add strength to the mold. Each coat takes a couple hours to dry. Repeat this until there is a thickness of 1/4” to 1/2”.
Next the ceramic shell molds are put in a kiln upside down. The kiln in heated to 1300° F which melts the wax, leaves the mold hollow, and makes the ceramic like glass. This new mold will be strong enough to receive the hot bronze that is poured into it. If there are any cracks from this process then they will be patched up with refractory mortar.
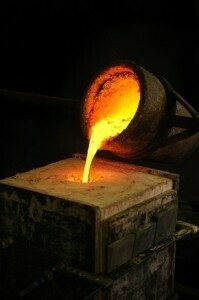
Now, molten material can be poured into the cast. Bronze is put in a crucible and put in a surface. After 45 minutes, the bronze will reach 2200°F which is how hot it needs to be in order to pour successfully. The heated bronze is poured into the mold, which was heated in a kiln to 1400-1500°F.
Once the metal has cooled, the ceramic mold is chipped off gently with the use of a hammer and chisel. Any leftover can be sand-blasted. The sprues are cut off using an angle grinder and a metal cutting disc. Any stubs left are sanded off. Then, the individual cast parts are checked to make sure they fit together. When they are welded together, this is when any necessary adjustments are made. The welds are then are then grinded and sanded. Surface textures are replicated with various tools.
Because the surface is sand blasted, the patina (the controlled oxidation of metal) can be applied. Patina can be put on in more than one layer in order to create visual depth. Once the desired patina is achieved, the surface is then heated with a torch and then coated with carnauba wax. This will further oxidize it and give it shine.
Now, the sculpture is finished and ready to be put on a pedestal!